Beginners guide: How to setup a validator node in reef-chain

I am system software engineer and Web3 developer by profession trying to learn everyday and sharing what i learn on this blog feel free to reach out to me with any feedback/suggestions.
Who are validators?
The consensus mechanism prevents double-spending and other fraudulent activities by ensuring that all nodes have the same view of the blockchain's history. Validators are incentivized to remain honest and to act in the best interests of the network by being rewarded in tokens. As validators continue to verify transactions, the network becomes more secure and trustworthy.
Role of Validators in Reef Chain
Being a Validator is more than just running a node in Reef you have :
Host bootnodes in the Reef chain
Host fast sync block export/import infrastructure
Implementing DevOps tools and maintaining them on a regular basis
Regularly maintaining security tools
Develop and maintain block explorers, RPC nodes, SQL indexers, and other public good infrastructure
Nominators elect validators through consensus and the legitimacy of their work in the community.
Configuring a validator node
Clone the repository
Firstly, You have to clone this repository
git clone --recursive https://github.com/reef-defi/reef-chain
Once you have cloned the repository, Install Rust if you haven't installed it through the below command:
curl --proto '=https' --tlsv1.2 -sSf https://sh.rustup.rs | sh
You should see an output like this when the Reef chain starts producing blocks.
Note:At the time I was writing this article I used binaries from this repo just clone it and run the following command. Most probably when you are reading this article it might be fixed kindly make sure you are using the latest possible version.
Use the following command to build the node without launching it:
make build
You can install the development compiler and the toolchain with:
make init
The below image is what you see when you start the development node.

The block proposals have been created and going through consensus.
It means you are running an instance of reef protocol
Congratulations!!
Create a local development environment
Run the temporary (development) node as follows:
make run
A local node can be configured using some of the following arguments:
./reef-node \
  --chain dev \
  --base-path /tmp/reefnode \
  --port 30333 \
  --ws-port 9944 \
  --rpc-port 9933 \
  --rpc-methods Auto \
  --rpc-cors all \
  --rpc-external \
  --ws-external \
  --name MyDevNode
Start a bootnode
It is vital for a P2P network to have bootnodes.
In order to generate our persistent node key, we need to run the following command:
./reef-node key generate-node-key
The following command would generate a public key followed by a private key:
12D3KooWL4scSWDRaTNja1KH4Rnv7JxVKGkrSvr9XH8Li8yL5mCA
1ba5794ee476523629e84661ee0d28707bf43a486bb204633b789ffc226fe559
Note: Make Sure the private key is safe and should not be handed to someone else in public this could lead to loss of funds
Now we can start our boot node with the generated private key by using the --node-key flag:
./reef-node \
  --chain mainnet \
  --base-path /reef/bootnode \
  --port 30333 \
  --node-key 1ba5794ee476523629e84661ee0d28707bf43a486bb204633b789ffc226fe559 \
  --name MyBootNode
This will run the bootnode and create your node.
Starting a validator node
Once you have setup your node we need to run the following command:
(At the time I was writing this article I used binaries from this repo just clone it and run the following command. probably when you are reading this article it might be fixed kindly make sure you are using the latest possible version )
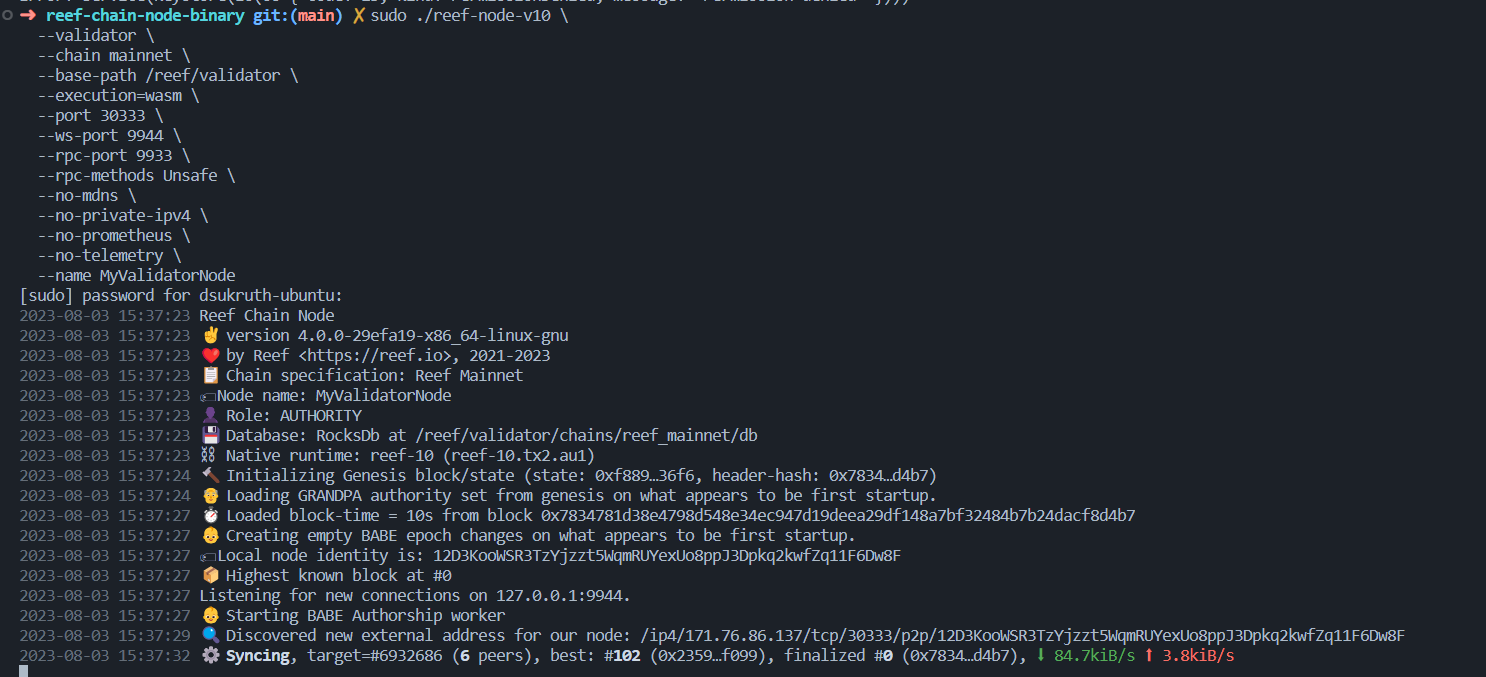
./reef-node-v10 \
  --validator \
  --chain mainnet \
  --base-path /reef/validator \
  --execution=wasm \
  --port 30333 \
  --ws-port 9944 \
  --rpc-port 9933 \
  --rpc-methods Unsafe \
  --no-mdns \
  --no-private-ipv4 \
  --no-prometheus \
  --no-telemetry \
  --name MyValidatorNode
Make note of the --rpc-methods Unsafe flag. As soon as the validator is configured, this flag should be omitted to disable key management endpoints (see systemd below). Do not expose wallet rpc endpoints to the public internet. This can lead to loss of funds.
The validator node looks something like below:
Creating session keys
There are 2 options for setting the session keys:
Let the node generate the keys via
author_rotateKeys(recommended)Generate them offline and submit them through
author_setKeys
1.Generating the keys within the node (Recommended)
It is possible to generate the session keys (or rotate the session keys) by using the author_rotateKeys RPC method
curl http://localhost:9933 -H "Content-Type: application/json" -d \
  '{"id":1, "jsonrpc":"2.0", "method": "author_rotateKeys", "params":[]}'
The result will be hex encoded:
{'jsonrpc': '2.0',
 'result': '0x4e0f43d7196b342b86c634ce6b1797e49e4ba5f01763324f2c9960ea33899561de3a616370becc71cb01775dc938f69d17b1ee0a4fd1689ede79c107f24b224c',
 'id': 7}
Inserting existing authoring keys
This is useful if our authoring keys have been generated via keypair tool. Note that the GRANDPA keys are ED25519, while the rest are SR25519.
We can then submit the seed+key derivation paths (suri) and the corresponding AccountId’s for all session keys via RPC:
curl http://localhost:9933 -H "Content-Type:application/json;charset=utf-8" -d \
  '{ "jsonrpc":"2.0", "id":1, "method":"author_insertKey", "params": [ "babe", "seed//babe", "0x..." ] }'

curl http://localhost:9933 -H "Content-Type:application/json;charset=utf-8" -d \
  '{ "jsonrpc":"2.0", "id":1, "method":"author_insertKey", "params": [ "babe", "seed//grandpa", "0x..." ] }'

curl http://localhost:9933 -H "Content-Type:application/json;charset=utf-8" -d \
  '{ "jsonrpc":"2.0", "id":1, "method":"author_insertKey", "params": [ "imon", "seed//im-online", "0x..." ] }'

curl http://localhost:9933 -H "Content-Type:application/json;charset=utf-8" -d \
  '{ "jsonrpc":"2.0", "id":1, "method":"author_insertKey", "params": [ "audi", "seed//authority-discovery", "0x..." ] }'
Note: The validator node will need to be restarted after setting or changing GRANDPA keys.
(Optional): Systemd service
You can use the following template to create a systemd service that automatically starts Reef node at boot:
[Unit]
Description=Reef Validator

[Service]
ExecStart=/bin/reef-node --base-path /reef/validator --validator --chain mainnet --execution=wasm --port 30333 --no-private-ipv4 --no-mdns --no-prometheus --no-telemetry --name MyValidatorNode
Restart=always
RestartSec=120

[Install]
WantedBy=multi-user.target
Make sure to configure the --base-path and the sentry nodes if you have them (recommended).
Bonding
This step is the same as when bonding as Nominators.
Session.setKeys and session.validate should also be called with the controller account set with staking.bond.
Validating
The final step is to signal regarding becoming a validator using the function session.validate(ValidatorPreferences)
You are now a candidate validator. To become elected as a Validator you will need to get Nominator’s support and win the elections.
Setting up identity
Set on-chain identification for your address to identify yourself to the Reef community. The identity includes the display name as well as socials (website, Twitter, and so on).
The easiest way to set the identity is via the console.
After you've established your on-chain identity, use identity.requestJudgement() with a charge of 100 REEF. The "REEF ECOSYSTEM" registrar verifies the IDs. Please write into the #reef:matrix.org group to complete the "KYC" and get your identity validated by the registrant.
Please keep in mind that the "REEF ECOSYSTEM" registrant is only accessible to present and prospective validators, as well as established projects deploying on the Reef chain. The registrar is not available for frequent account verification for "KYC" purposes.


